Saturday 19 December 2015

Simple 3 channel trainer

This design was inspired by a friend who wanted to take one of my "retired" planes to learn how to fly. So I gathered bits and pieces together and tried to come up with an easy to fly, crash proof trainer.

It only has rudder elevator and throttle, no ailerons. I wanted it to be as light as possible for slow and easy flight with a big energy absorbing nose and a tough fuselage.


The fuselage was shaped from a 50 x 100 x 370 block of XPS insulation foam and the tail planes are 8mm panels of the same foam. The boom is a Skyshark P4X 7.6mm tube.

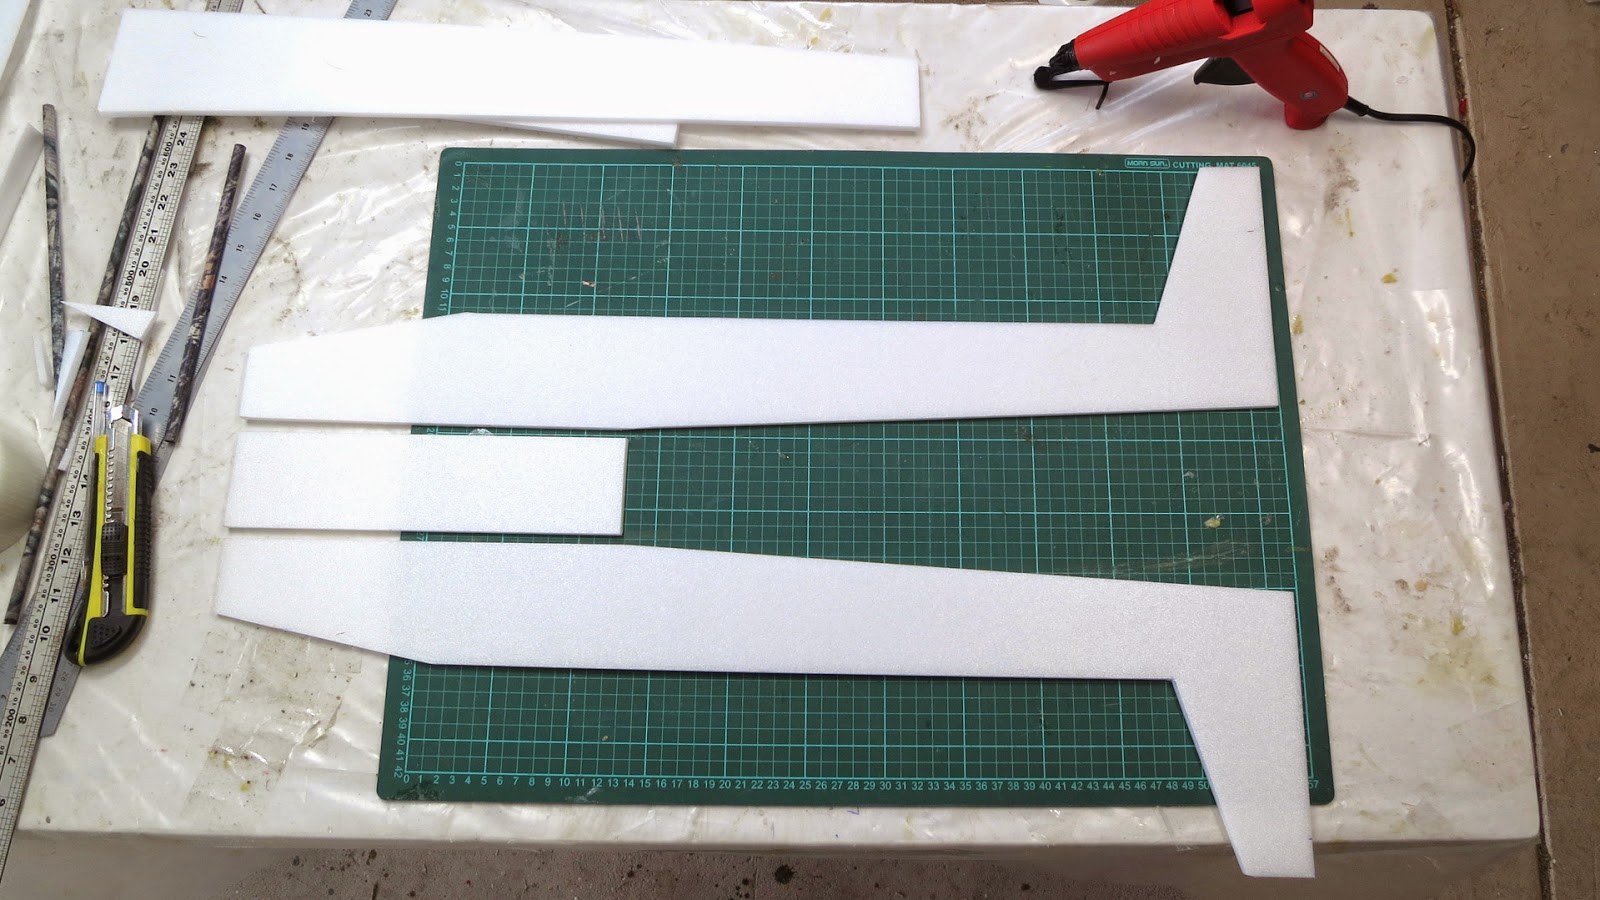
The hotwire-cut 170mm clark y wing comes from rescued sections of the drowned Fokker (which now has new wings) Three x 360mm sections were glued together with the tips each raised 120mm. No spars are needed to hold the polyhedral due to the tape covering and large join surface area for gluing.


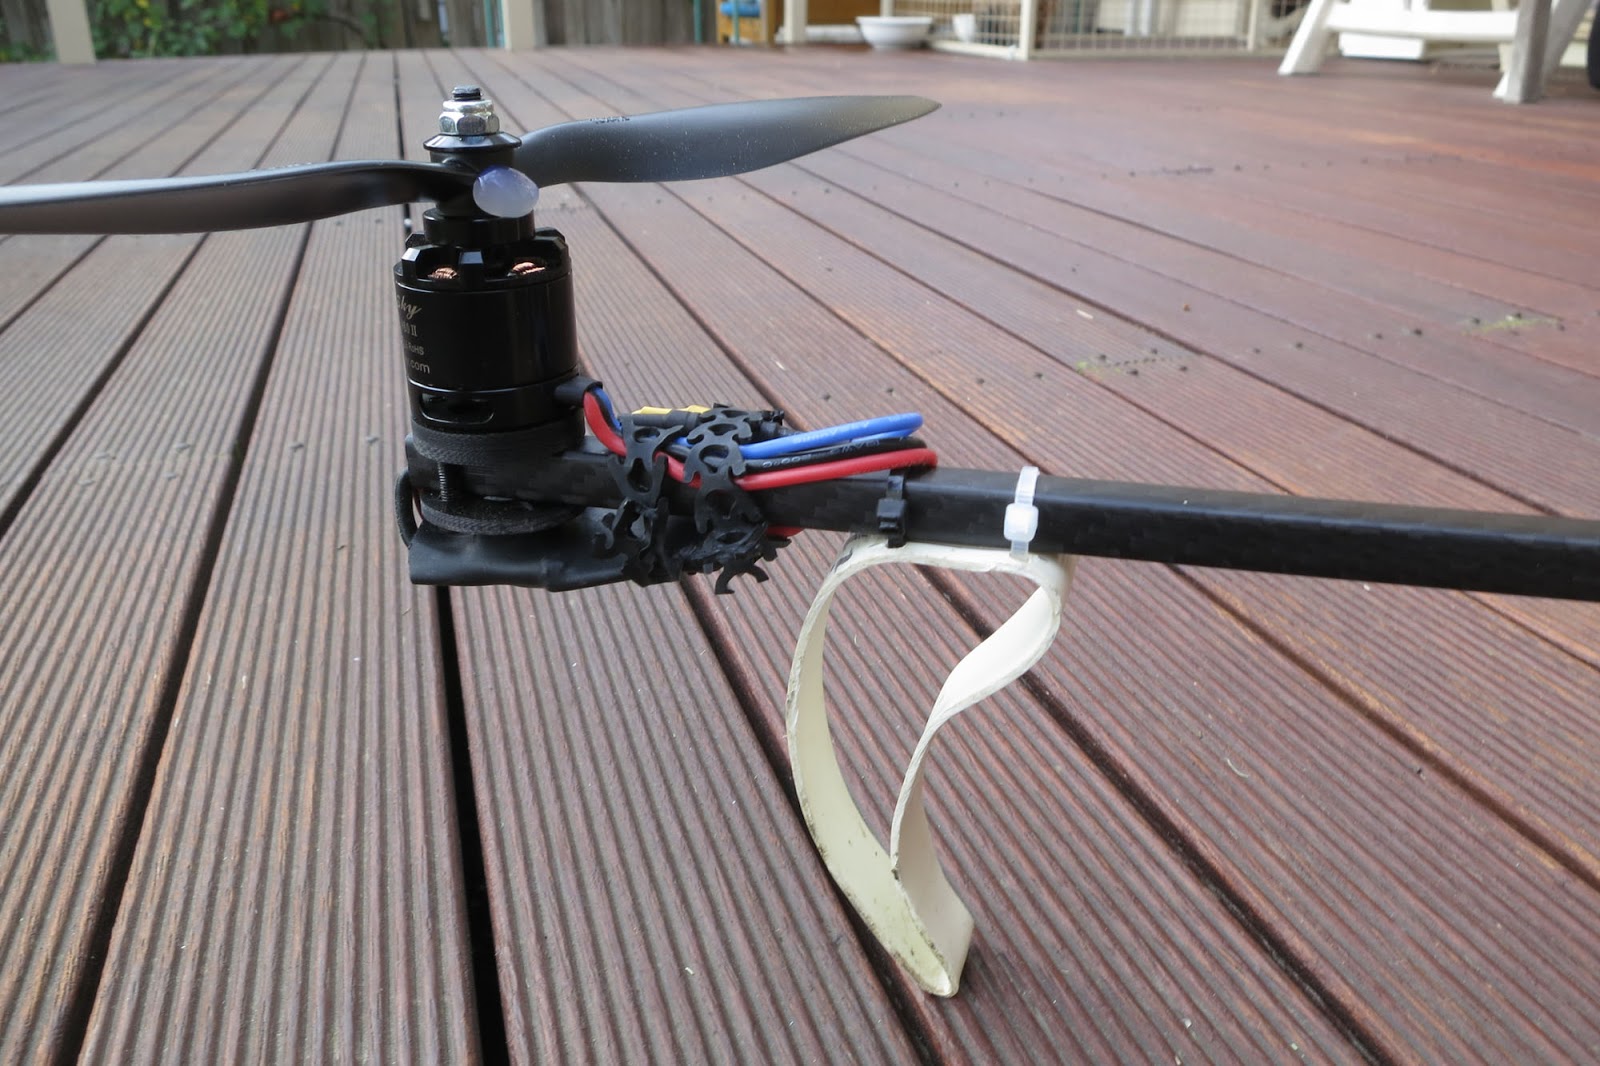
The nose is soft packing foam covered with tape and completely encases the 1300mAh Lipo battery.

The motor is the original Bixler 2, servos are cheap 9g HXTs, and it has a Plush 18A ESC and HobbyKing 3 channel receiver.

All up weight with the battery adds up to 550g, giving a slow continuous cruising flight time of over 30min.

This plane is very smooth and stable and with correct trim will fly hands off.

At this stage the nose, fuse and wings are almost bullet proof, but the tail planes are a bit too delicate. Thinner sheets of XPS foam are quite brittle so some kind of reinforcing is needed.  Both the elevator and rudder have cracked during the test flights so I have added a 0.5 x 3mm CF spars.

Might be better to use depron or corflute for the tail.


Dimensions


Flight video - motor slope soaring

Build video


UPDATE 30 March 2016 

After some tough flight testing by my dedicated student test pilot it became apparent that this tail
design was not crash proof enough.

So here is the new tougher tail design made from depron. The tail to boom join has extra foam fillets either side for more gluing area and to raise the elevator a little.

The new wing has more area and less polyhedral for smoother flight.


Update overview video

Tail build video

Dimensions for the updated tail design


MATERIALS
New Stuff iron-on film - EZload laminate - http://www.neopostonline.com.au/lamination/ez-load-roll-film

BUILD VIDEOS


Saturday 31 October 2015

1.1m Fokker Dr 1 triplane

Two wings on the Tigermoth worked so well I had to take the next step...three wings.


The most famous triplane is the Red Baron's Fokker Dr1.

My wings are stiff enough not to need inter plane struts so I decided to stick to the familiar rubber band mounts. That meant I had to come up with a method for creating a rigid mount for the top wing. I recorded detailed build videos along the way.

SPECS
Top Wing - Top 1.1m, iron-on laminate and packing tape. 0.5 x 3mm CF spars
Middle and lower wings - 950mm and 900mm. packing tape. 0.5 x 3mm CF spars
Airfoil - 170mm Clark y
Fuselage - 6mm depron, 3mm ply nose, packing tape.


Saturday 3 October 2015

1.2m Tigermoth

I have never been much interested in scale model planes apart from the Tigermoth biplane. Tigermoth World is nearby and for my 40th Virginia and I went for aerobatic joy flights...great fun.

I already had enough practice hot wire cut wings laying around for the build so I decided to have a go. I gathered scale measurements from tiger moth photos and made the adjustments needed for a 1.2m wingspan model.

The fuselage is 6mm depron covered with yellow packing tape to mimic the plane I flew in. I added 3mm ply under the nose to take landing impacts and a 5mm ply motor mounting firewall.

The motor is a Hextronic DT750 which had plenty of thrust, especially with a 4S battery. Prop is 11 x 5.5", ESC 40A Plush. 3000 mAH 3S or 4S Lipo gives 20+ minutes of cruising.

Here are build and flight videos of this great looking vintage biplane. It flies just like the real thing, slow and steady with just enough aerobatic capability.

Sunday 20 September 2015

New DLG - Hobby King 1.5m V2

My much loved Versus DLG has been crashed and repaired many times and is looking a bit rough now. But it was a great intro to DLGs. Hobby King's big sale came along at just the right time. The updated Versus, now called the V2, dropped from A$450 to $280, couldn't resist that price.

The V2 has a disser construction wing, crossed CF ribbon reinforcing, and a kevlar pod but otherwise is identical to the Versus.

I bought the Plug N Fly version which is OK, but might have been wiser to get the ARF version and add my own servos.

Here are my detailed build videos showing strengthening and control mods.
After a few weeks the V2 is going well, feels like a better Versus. I wouldn't pay full price for it because there are many better alternatives available, but for the sale price it is excellent.

Sunday 2 August 2015

Balsa / fibreglass tails

Ages ago I came across this article by John Gallagher on wax paper bagging DLG tail surfaces, and ever since I have wanted to give it a go.

I'm working on a Fusion style pod and boom sloper designed by Leadfeather on RCGroups and thought bagged balsa tails would suit. My foam elevator is proving to be a bit delicate for repeated rough landings.

2.5mm x 75mm balsa sheet. Elevator will be 100mm wide so an extra strip needs to be glued on. 
I'd probably use thinner balsa for DLG tails or sand down the 2.5mm. 
Later I realised 100mm wide balsa is also sold at Bunnings.

Landing Gear

Here's how I make landing gear using 2mm piano wire for the axle 
and 20 x 1.5mm aluminium flat for the struts. 
Wheels are pool noodle foam glued to bottle caps.

Piano wire axle has a bend on one end

Saturday 4 July 2015

Hot Wire foam cutting rig

A couple of things prompted me to try this traditional foam wing cutting method.


1. Thick boards of XPS insulation foam appeared in Bunnings. Either I have been unobservant or they have just recently added this stuff to the product line. 30mm and 50mm thick 1200mm x 600mm boards are available for $12 and $20.

2. There was an old PC power supply that was about to be trashed at work and I already had some 0.6mm MIG welding wire for the resistive wire.

I followed some online videos about getting 12V DC from the PC power supply. First time I turned it on the house safety switch tripped so it went in the bin.


Instead of a mains supplied power source I decided to try using a 3S LiPo, and it worked beautifully.

I'm using a watt meter to keep an eye on battery level, current and consumed mAh


The pine frame stretches the resistive wire across a 750mm span at the front. Tension is maintained by stretchy shock cord at the back.


Voltage is applied to heat the wire via alligator clips and I have an ON OFF switch on the frame. The LiPo connects via an XT60 plug.


Airfoil images and plots can be downloaded from The University of Illinois Airfoil Data Site. To make templates the airfoils need to be resized, printed then cut out of a rigid heat resisting material. I'm using 3mm MDF board but G10, formica and carbon fibre are also used.

The MIG wire broke mid cut a couple of times so I changed to 40kg stainless steel fishing wire and it's working well. It's 7 strand and nylon coated so the coating needs to be stripped off. I burned it off but it can also be easily peeled off using a knife.

Here's the "How to" video including a test flight.


As these wing cores are solid foam there is nowhere for the spar to fit. 
This video shows three ways to form a spar channel.


UPDATE Jan 2016

I am now using a 4S Lipo for more heat in the wire, enabling a faster and smoother cut for 850mm wing halves.

I have changed to thin aluminium sheet (I think it's window flashing) for the templates. Can be cut out with scissors.

4S power and Aluminium template in use


Tuesday 16 June 2015

SunnySky 2212 motors

The SunnySky X2212 KV980 motors finally arrived from Banggood. They went out of stock for a while, might have had something to do with reports of poor quality copies sneaking into Banggood's inventory. Apparently the supply problems have been resolved now.

Mine seem to be genuine and do perform beautifully. They are smooth and efficient, giving about 50% longer flight times than the DT750 motors.

The Emax 10x4.5" props also from Banggood work well with this setup.


Sunday 31 May 2015

Tricopter updates

Having established that I could build and fly a tri it was time to update to decent quality components.

I bought carbon fibre arms, power distribution body (with onboard BEC) and tilt mechanism with Blue Bird digital servo from rcexplorer.se 

Prices are very reasonable for these excellent components and postage is only US$7 from Sweden, better than most Australian outlets.

David's tricopter parts are almost works of art, especially the 10mm square woven carbon fibre arms.

From HobbyKing I bought Hextronic DT750 motors and some Turnigy Slow Fly 10x4.5 props.


Hextronic DT750 motors

I need to share my experiences with these DT750 motors. They are well suited to tricopters but do have some design faults which need to be dealt with first.

ESC wire support
The 3 wires are not flexible, just continuations of the single core windings, and will break with bending and vibrations. To prevent this they must be supported around the base with big blob of epoxy glue. I used 5min Araldite and it worked well.

Motor shaft "pull-up"
The shaft is about 40mm x 4mm and threaded. In theory you don't need a vibration inducing prop adapter, just a nyloc nut. BUT unfortunately the shaft is not rigidly fixed to the motor bell. Tightening the nut enough to stop the prop slipping pulls the shaft up through the motor bell. This increases the bearing friction making the motor heat up and draw more current. The shaft is only held in the bell by one tiny grub screw, which is not enough to resist the "pull-up" from the prop nut.

I had some nasty crashes caused by a slipping tail prop because I couldn't tighten it down enough. Broke an arm and ruined an expensive digital servo.

The solution is to put a nut onto the shaft right down to the unthreaded part, then a washer, prop, washer and nyloc nut. That way the prop doesn't push down on the motor bell. Unfortunately I had already cut the shaft too short before I discovered this problem so have had to resort to bulky 4mm prop adapters.

Quest for the best propeller
Turnigy Slow Fly 10x4.5 props are OK but very thin and flexible.

10x5 Gemfan Carbon nylon Graupner copies from Banggood are much stiffer but less efficient giving shorter flight times.

Emax 10x4.5 props from Banggood are a bit stiffer than the Turnigys and may be the perfect choice. Testing continues.


Sunday 10 May 2015

Tricopter build

Here's a quick and dirty tricopter build mostly using materials from my local hardware store.

It covers the basics of design and assembly. The tri flies OK but performance would be improved with more balanced motors and prop adapters and some P and I adjustments.

I haven't covered KK2 setup and tilt mechanism construction but David Windestal's has...

KK2 setup
Tricopter V2.5 build (including tilt mechanism) 


Tuesday 5 May 2015

Tricopter

Thanks to great build videos by David Windestal I have recently become interested in tricopters. 


Until now I have not bothered with multi rotors at all and still prefer wings and airfoils to motors. But it looked easy enough and searching through my spares box found most of the required electronics. I had three 2822 1450kV motors and three 25A Plush ESCs so only needed to buy a flight control board and some counter rotating props.

Why a tri and not a quad? 
Well every man and his dog has a quad which makes tricopters cooler.
Tricopters have a tilting tail rotor for steering, which gives more "plane-like" flight characteristics. Also there are only 3 motors / ESCs rather than 4 so they are cheaper.


KK2 flight control board
The brains of a multi rotor is the flight control board. I chose the simplest board, the KK2 (A$26 from Hobby King).

The KK2 takes your Aileron, Elevator, Throttle and Rudder commands (or stick movements) and translates them into motor speed changes and tilt servo movements.  
The KK2 has 2 flight modes: Manual, where the tri will stay at the flight angle you command until you make a correction. Self-level, where the tri will return to level when the sticks are centred. The KK2 also supports the Super Simple Gimbal which is really simple and really works, kind of like steady-cam for an onboard camera.

KK2, Rx and servo power supplies
KK2 board on a tricopter requires two power connections, one to power the board and the receiver, and the other to power the tail servo. They need to be separate for it all to work smoothly. Something about gyros and servos and power loops can cause jittering and instability apparently.

The ESC from motor 1 (front left) plugs into the M1 pins on the KK2 (top right) and provides 5V to power the board and receiver. Do not be tempted to plug 12V in anywhere or you will have to order a new KK2 board (yes I did). There are battery monitoring pins but make sure you know what you are doing before connecting, or just dont use them.

On tricopters a second BEC must be connected to M2 pins (or M3...M8) to provide 5V to the servo. You can use the built-in BEC from the ESC on motor 2 if it is rated high enough. Otherwise add an external BEC.

More than one "switching" style BECs should not be connected on these pins at the same time. Linear BECs are OK. If the ESCs on both motor 2 and 3 have switching BECs remove the red servo wire from one of them to disconnect it's BEC.

On a Quad you can use one normal ESC connected to M1 and three OPTO ESCs because there are no servos needing power. OPTO ESCs do not have an onboard BEC.

Firmware upgrades
There is a lot of chat on RCgroups about which firmware is best for the KK2 and the ESCs on a multi rotor. Apparently Stevis for the KK2 gives more options and better performance than the stock firmware, and SimonK firmware for the ESCs gives smoother and more responsive performance. To start off I used the stock firmware on everything just to get a feel for flying multi rotors, and it all worked perfectly well.

I have since flashed the KK2 with Steveis V1.9 using a $5 USBasp programmer from ebay, and bought Afro ESCs pre flashed with SimonK. Performance is smoother and more responsive.

Here are some early videos. I'll add a build video and onboard footage soon. 
At the moment I'm spending time learning to fly better and optimising the tricopter to reduce vibrations. Stay tuned.

Testing and maiden flights

Arm repair time-lapse


SPECS

Motors - Turnigy 2822/14 1450kV

ESCs  - Turnigy Plush 25A (stock firmware) x 3
Updated to Afro 30A (simonK firmware) One with BEC to power the board and 2 OPTO (no BEC) plus a Plush 18A ESC (which has a linear BEC) just to power the servos

FC board - KK2.1.5 stock firmware
Updated to steveis V1.9 firmware

Props - weak flexy green 8 x 4.5" Hobby King / Gemfan
Updated to much stiffer Gemfan 8045C carbon nylon CW/CCW pairs from Banggood

Friday 3 April 2015

1.2m Acrobat

I was keen to try some aerobatics with powered planes but The Red was not quite up to the task. Too much of a glider and not enough rudder. So this is what I came up with.


It has a 1.2m x 180mm 12% chord Armin wing and a 700mm fuselage both made from 6mm depron covered with 75 micron document laminating film. That is the thicker laminate and it added lots of strength.

I also wanted to try a design with the tail as part of the fuselage, and test a full flying elevator setup. Both are working very well so far.

Fuselage construction started with the side and bottom panels in uncovered depron

The sides were glued on top of the bottom panel, which defines the width of the front area.

The tail halves were glued together giving the taper curve, then top and bottom panels added.

The fuselage was then covered with 75 micron laminate. 
This added a great amount of strength, especially to the narrow tail area. 

The 2826/10 1400kV motor is mounted to 5mm plywood with ventilation holes drilled out. Initially I built in some down thrust but I am still testing to find the right amount. Plastic washers can be added or removed to vary the angle.

The most radical feature of this design is the flying elevator. The whole horizontal stabiliser pivots on a 3mm carbon fibre rod which also acts as the spar. The rod passes through a brass tube glued into the tail. The inner diameter of the brass tube must be just bigger than the CF rod to give free movement but minimal wiggle. To hold the brass tube firmly there are 25mm discs of foam sandwiched between ID card plastic on either side.

Plans

Overview and build video

Field and slope flights


SPECS
Armin wing span - 1.2m (47") 
Airfoil chord - 190mm (7") including 45mm (1.5") ailerons
Airfoil thickness - 23mm (12%) using 9mm formers 
Spar - Skyshark P4X 7.5mm x 850mm, 57mm back from LE
Fuselage Length - 700mm (27.5")
Flying weight (2200mAh LiPo) - 770g
Full span Ailerons / Flaperons
Full flying Elevator
Large Rudder
TGY 9018MG servos x 4 
Motor - Turnigy 2826/10 1400kV with 8x4 prop
ESC - Plush 40A

MATERIALS and LINKS

Saturday 7 March 2015

RC plane building materials

Latest Update Feb 2021


Carbon fibre
Skyshark P4X woven tubes - Wing spars and tail booms
7.54mm OD x 825mm (32.5") - Kites and fun things                
US$3.50 each. Freight is about US$45 to Aus. These are woven carbon fibre tubes, which are lighter than pulltruded tubes and less prone to splitting. Great for big kite spars also.

6 x 1mm and 3 x 0.5mm CF strip - light weight spars and reinforcing
2 to 5mm CF rod and tube - wing tie downs rods and elevator axle
12k CF tow (ribbon of unwoven fibres) - reinforcing and repairs

Rubber bands Size 64 (87 x 6mm) wing tie downs - Officeworks
Buy a 500g bag, they need frequent replacing. Dont buy the coloured version, they are weaker and fail sooner.

Laminating film and Packing tape
Iron-on document laminating film (covering)
3 mil (75 mic) is the most useful thickness, you can also use 1.7 mil (42.5 mic) for lighter builds. I bought 305mm wide rolls of GBC EZLOAD Lamination film but it may no longer be available

This laminate from Bound to Impress may be suitable but not tried by me 75 micron laminate


Scotch heavy duty exterior double sided tape (motor mount, servos) - Bunnings
Norton Bear cloth tape (reinforcing) - Bunnings
PPS clear 43 and 60 micron packing tape (covering, hinges) Officeworks

PPS coloured packing tape (covering - 5 pack) - Officeworks
UPDATE: October 2015 - Looks like this coloured packing tape is no longer available at Officeworks. Need to buy Hobby King covering tape or Ebay from now on.
UPDATE: Jan 2016 - KMart now sells coloured packing tape (Thanks Joe)

Scotch Transparent Tough Tape (joining, reinforcing) - Bunnings
This is my favourite reinforcing tape but it's more expensive. Strong holding, flexible and lighter than cloth tape. Used to join wings, hold landing gear on and to reinforce control horns and hinges. Use cheaper Bear cloth tape where weight and strength are not as crucial.

3M Blenderm Tape for hinges - HobbyKing, Medical Supplier

Glue
Hot glue gun - Crescent 60W Bunnings and this 12V battery one from Hobby King
Brown Gorilla Glue
Accent Polyeurethane Glue - Mitre 10
Z-Poxy Epoxy finishing resin - ebay and Tates Hobbies Geelong
Foam Safe CA - Hobby King
Thread locker (Blue = releasable) for motor bolts - Supercheap Auto
UHU Por Foam safe contact glue - HobbyKing

Foamboard
If you cant get Flite Test or Adams foam board (only available in US), then depron is the best alternative.
Genuine depron is stiffer and stronger than other uncovered foamboards.

Beware - Paper-covered foam boards in Australia, like Quill from Officeworks, are much heavier and way more expensive than Dollar Tree foam board used by Experimental Airlines and Flite Test. Dollar Tree foam board is not sold in Aus so I use depron with tape or laminate covering. Depron is waterproof and lighter and much more durable than paper covered foam board.

Hot wire cutting bits
Knauf XPS insulation foam 30mm and 50mm thick - Bunnings
Hotwire wire - 40kg (90lb) single strand SS fishing wire
Template aluminium - 0.3mm Weatherflash window flashing

Bits and pieces
Blank ID cards - Search Ebay for CR80 blank ID cards
Piano wire for Push rods (0.047" or 1.1mm) or Landing gear (2.5mm to 3mm) - Tates Hobbies 
Linkage stoppers - Hobby King
Z-bend pliers (worth having) - Hobby King
DuPont connectors useful when you need more or less pins than three (servo style connector kit) - Search Ebay

Tuesday 3 March 2015

FrSKY Lipo voltage sensor

This sensor (cost about A$22) enables telemetry for the total battery voltage and individual cell voltages. Also called the FLVSS sensor.

It is small and lightweight and has a very clear OLED screen which means it can be used as a stand alone battery checker.

It plugs into the balance lead of the battery and connects to the X series receiver via the Smart Port.


This video covers connection and setup directly on the Taranis Plus transmitter. Spoken values and on-screen display of total voltage and the lowest individual cell voltage, with a little flight at the end.


FrSKY 40A current sensor

This sensor (cost about A$27) enables current, voltage and consumed mAh telemetry. This is one of the most useful modules for flying powered planes because it means you don't need to keep landing to check the battery level.

It plugs in-line between the battery and ESC and connects to the receiver via the Smart Port.

This video covers connection and setup using OpenTX companion, Taranis Plus transmitter and OpenTX 2.0. On-screen display and spoken voltage and mAh consumption values. Viewing of recorded logs in OpenTX companion.

Sunday 1 March 2015

FrSKY GPS sensor

This is the FrSKY GPS sensor which enables position, altitude, speed and distance data on the Taranis. Cost about A$49.


The UP side must face upwards with a clear view of the sky, under foam may be OK.

Once connected it takes a few minutes for the sensor to acquire satellites. 
When it is ready the red led will change from fast to slow flashing and Lat and Long will appear on the telemetry screen 3.


This video covers connection and setup, how to enable spoken altitude, speed and distance values, telemetry logging and displaying flight tracks in Google Earth.


Saturday 28 February 2015

FrSKY Variometer sensor

This is a barometric pressure sensor which provides telemetry for vertical speed changes and altitude. These values are very useful for RC glider pilots looking for thermal lift. Cost about A$33 (Feb 2015)


The telemetry can be presented in a few different ways.

1. As beeps of varying pitch to indicate whether the glider is rising or sinking. Higher pitch beeps for rising or lift and lower pitch beeps when it's sinking.

2. As spoken altitude values. My preferred method.

3. As on-screen numbers. Not so good because you have to look away from the glider to see the screen.

4. As an altitude graph in OpenTX companion on your computer. (If SD card logging is enabled on the Taranis)


This video explains how to connect and setup the vario with a Taranis Plus running OpenTX 2.0, and with OpenTX companion on an iMac.


Thursday 26 February 2015

FrSKY Telemetry sensors

One of the most exciting functions of the Taranis X9D is telemetry. 
As well transmitting signals to the onboard receiver, the Taranis can receive data sent back from sensors on the plane. That data can be recorded on the SD card for later viewing, or presented live on the screen or even as spoken values and audio prompts.

In the next series of posts I will explain the functions of each sensor and how to get them working.

Here are four of the FrSKY telemetry sensors with the X8R receiver. 40A current sensor. LiPo voltage sensor. Variometer sensor. GPS sensor.

Each sensor is supplied with a female to female servo lead to connect it to the S-Port on the receiver. A second set of S-Port pins allows more than one sensor to be connected to the receiver at a time. You simply connect one sensor to the next in line.

Once correctly connected to a powered receiver the red LED on the sensor will change from fast flashing to slow flashing. That may take a few more minutes with the GPS.

At this stage the sensor is transmitting telemetry data but you can't see it anywhere. You need to go to the Special Functions screen for the current model to activate telemetry recording and sounds, or the Telemetry setup page for on-screen displays.

Activating SD logs

In the Special Functions screen select a switch (e.g. SG-), select "SD Logs" from the list of available functions, select how often telemetry data points are recorded (e.g. every 1.0s) Now whenever the SG switch is in the middle position telemetry data is recording onto the SD card.
SD logs include all the available telemetry data. RSSI (signal strength) and the position of every stick, knob and switch on the Taranis are recorded without any sensors required. With the appropriate sensors connected data like speed, position, altitude, distance, current, power usage and voltage are recorded. It's a mass of fascinating information to look at after your flight using OpenTX companion. If you're in to graphs you will love SD logs. 

Here are a few examples of what is available via OpenTX companion on your PC. 
I will go into more detail with each sensor in following posts.

Signal strength

Flight battery voltage

Current draw 

Telemetry display screens

To view the data in real time you need to go to the Telemetry setup page for your current model, scroll down to Screen 1 and select the values to be displayed. You can choose Bars for bar graphs or Nums for numbers on the screen.

In this example I have selected RSSI, Current and Timer 1 to be displayed on Screen1 of the telemetry screens. The 40A current sensor would be required in this case.
Here's how it looks on the live telemetry screen. Of course numbers greater than zero would appear if the plane was powered up and flying.

Spoken telemetry

The most useful way to present live telemetry is via sound or voice. Dependng on which sensors are connected the lovely lady in my Taranis can tell me such things as the altitude of my glider or how many mAH have been consumed, no need to look at the screen at all. 

To activate audio telemetry go to Special Functions, select a switch, select PlayValue, select which value to play and select how often to repeat.

In this example the Taranis will tell me the Consumed Power (Cnsp) in mAH every 10 seconds when the SC switch is down. (As long as the 40A current sensor is connected)

This is only scratching the surface of what is possible with the Taranis and OpenTX. 

There are logical switches to play with and LUA scripting as well. LUA scripts are like little programs that you can run on your transmitter. They can add functions like the Model Setup Wizard or extra graphical telemetry screens. There are hundreds of scripts available for download on the OpenTX forums. The possibilities are endless.